简介:
以前给大家介绍过谷歌云DD安装windows的教程,但因为谷歌云没有VNC可以看到安装进度很多朋友留言说谷歌云安装windows不成功,今天我们再一起研究下谷歌云安装windows的几个关键步骤。
一、谷歌云创建实例
1、创建防火墙规则
进入谷歌云管理界面点击左上角的三条杠–VPC网络–防火墙
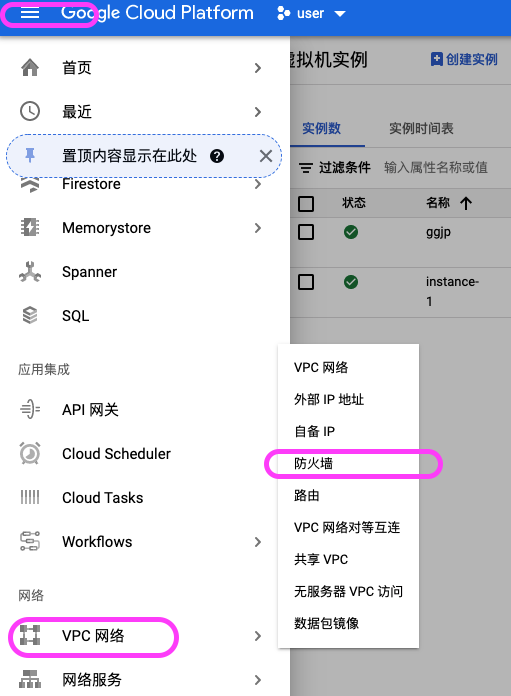
创建防火墙规则,一共需要创建两个规则,一个出站一个入站,首先我们先创建一个入站的规则
1)名称起一个能记住的名字 比如入站rz 出站 cz,我们先创建rz,流量方向选择入站
2)目标–选择所有实例
3)来源IP地址–填入0.0.0.0/0
4)协议和端口选择–全部允许
如下图
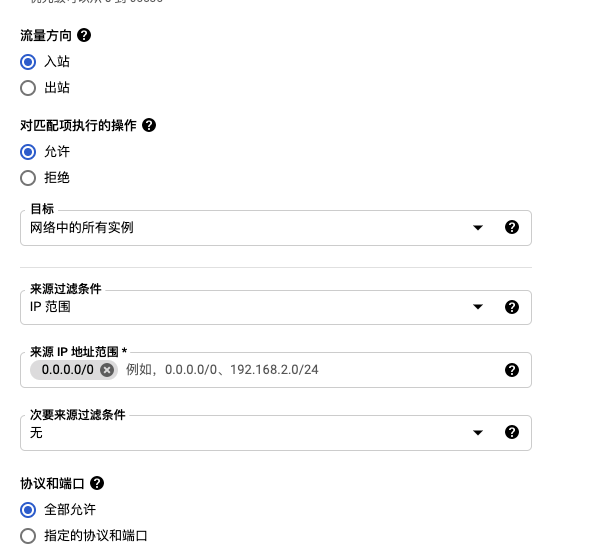
5)入站创建完成后,同样的方法我们再创建一个出站,流量方向那里选择出站
2、创建实例
这个创建实例就不过多介绍了
主要注意三点
1)启动磁盘那更改,系统Debian或者Ubuntu,硬盘大小建议16G以上
2)允许HTTP和HTTPS流量,网络下添加上面建好的两个防火墙规则
3)记住网络接口地址和斜杠后面的数字,一会需要,这部是关键!!!!!!!
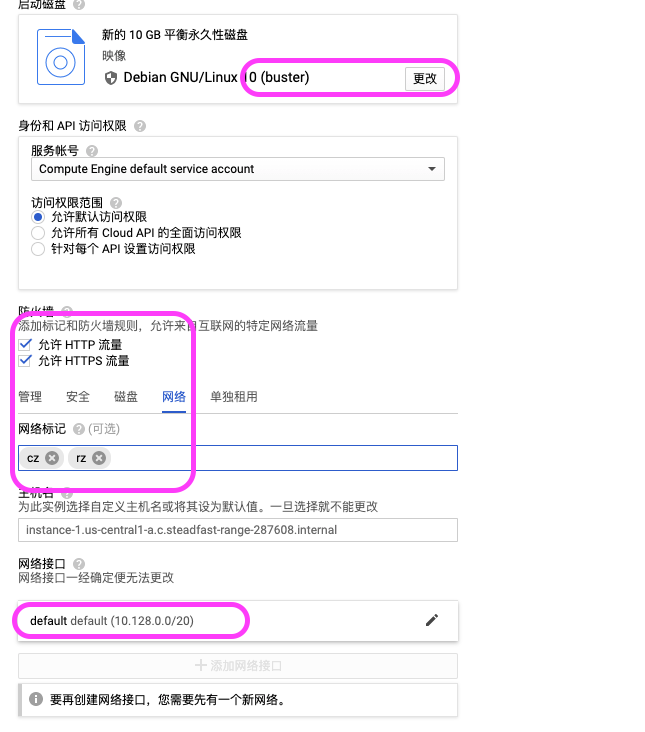
创建完实例剩下的就是DD安装windows了
二、DD安装Windows
1、安装依赖
SSH链接上谷歌云中你的实例
获得权限
sudo -i
更新系统
#Debian/Ubuntu:
apt-get update
#RedHat/CentOS:
yum update
安装依赖
#Debian/Ubuntu:
apt-get install -y xz-utils openssl gawk file
apt-get install wget
#RedHat/CentOS:
yum install -y xz openssl gawk file
DD一键安装脚本
wget --no-check-certificate -qO InstallNET.sh 'https://moeclub.org/attachment/LinuxShell/InstallNET.sh' && bash InstallNET.sh --ip-addr X.X.X.X --ip-mask X.X.X.X --ip-gate X.X.X.X -dd 'DD包 直链地址'
谷歌云OVH云服务器安装的时候需要制定网络参数,所以上面代码中的x.x.x.x需要替换成你自己实例的地址
# 将X.X.X.X替换为自己的网络参数.
–ip-addr :IP Address/内网IP地址
–ip-mask :Netmask /子网掩码
–ip-gate :Gateway /网关
1)内网IP地址和网关
内网地址在谷歌云的管理界面中可以看到,如下图
网关一般把地址最后一位改成1即可
2)子网掩码!!!!!
很多人安装完成后不能链接就是因为子网掩码设置不正确,你创建的实例不一定掩码就是255.255.255.0,所以按照其他教程填入掩码导致链接不上服务器,所以我们上面提到创建实例的时候要记住你的内网地址段和数量,我们需要根据IP地址来自己算你自己的子网掩码
给大家一个网址方便计算子网掩码
https://www.sojson.com/convert/subnetmask.html
打开网站后输入你的内网网络IP和掩码位(掩码位就是前面创建实例时候让大家记住的斜杠后面的数字)

输入后点击计算就可以看到你的子网掩码
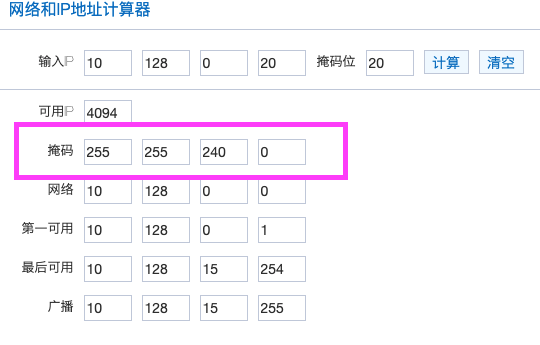
3)修改代码中的x.x替换你自己的ip、掩码、网关进行安装
三、DD包
因为DD包很多时候会失效,所以在安装前一定一定要测试一下DD包的地址是否可以用,最简单的方法就是复制地址在浏览器中看是否能打开
下面放出一些还能用的DD包地址
精简版DD包
# DD Windows Server 2008 R2 64位 精简版 [账户Administrator密码nat.ee] wget --no-check-certificate -qO InstallNET.sh 'https://moeclub.org/attachment/LinuxShell/InstallNET.sh' && bash InstallNET.sh -dd 'https://oss.sunpma.com/Windows/Win_Server2008R2_sp1_64_Administrator_nat.ee.gz' # DD Windows Server 2012 R2 64位 精简版 [账户Administrator密码nat.ee] wget --no-check-certificate -qO InstallNET.sh 'https://moeclub.org/attachment/LinuxShell/InstallNET.sh' && bash InstallNET.sh -dd 'https://oss.sunpma.com/Windows/Win_Server2012R2_64_Administrator_nat.ee.gz' # DD Windows Server 2019 64位 精简版 [账户Administrator密码WinSrv2019dc-Chinese] wget --no-check-certificate -qO InstallNET.sh 'https://moeclub.org/attachment/LinuxShell/InstallNET.sh' && bash InstallNET.sh -dd 'https://oss.sunpma.com/Windows/Win_Server2019_64_Administrator_WinSrv2019dc-Chinese.gz' # DD Windows7 32位 精简版 [账户Administrator密码nat.ee] wget --no-check-certificate -qO InstallNET.sh 'https://moeclub.org/attachment/LinuxShell/InstallNET.sh' && bash InstallNET.sh -dd 'https://oss.sunpma.com/Windows/Win7_86_Administrator_nat.ee.gz' # DD Windows7 sp1 64位 企业精简版 [账户Administrator密码nat.ee] wget --no-check-certificate -qO InstallNET.sh 'https://moeclub.org/attachment/LinuxShell/InstallNET.sh' && bash InstallNET.sh -dd 'https://oss.sunpma.com/Windows/Win7_sp1_64_Administrator_nat.ee.gz' # DD Windows8.1 64位 专业精简版 [账户Administrator密码nat.ee] wget --no-check-certificate -qO InstallNET.sh 'https://moeclub.org/attachment/LinuxShell/InstallNET.sh' && bash InstallNET.sh -dd 'https://oss.sunpma.com/Windows/Win8.1_64_Administrator_nat.ee.gz' # DD Windows10 2016LTSB 64位 企业深度精简版 [账户Administrator密码nat.ee] wget --no-check-certificate -qO InstallNET.sh 'https://moeclub.org/attachment/LinuxShell/InstallNET.sh' && bash InstallNET.sh -dd 'https://oss.sunpma.com/Windows/Win10_2016LTSB_64_Administrator_nat.ee.gz' # DD Windows10 2019LTSC 64位 企业适量精简版 [账户Administrator密码Vicer] wget --no-check-certificate -qO InstallNET.sh 'https://moeclub.org/attachment/LinuxShell/InstallNET.sh' && bash InstallNET.sh -dd 'https://oss.sunpma.com/Windows/Win10_2019LTSC_64_Administrator_Vicer.gz'
完整版DD包
# DD Windows Server 2012 R2 Datacenter 64位 完整版 [账户administrator密码Password147] wget --no-check-certificate -qO InstallNET.sh 'https://moeclub.org/attachment/LinuxShell/InstallNET.sh' && bash InstallNET.sh -dd 'https://oss.sunpma.com/Windows/Whole/cn_windows2012r2_administrator_Password147.gz' # DD Windows Server 2016 Datacenter 64位 完整版 [账户administrator密码Password147] wget --no-check-certificate -qO InstallNET.sh 'https://moeclub.org/attachment/LinuxShell/InstallNET.sh' && bash InstallNET.sh -dd 'https://oss.sunpma.com/Windows/Whole/cn_windows2016_administrator_Password147.gz' # DD Windows Server 2019 Datacenter 64位 完整版 [账户administrator密码Password147] wget --no-check-certificate -qO InstallNET.sh 'https://moeclub.org/attachment/LinuxShell/InstallNET.sh' && bash InstallNET.sh -dd 'https://oss.sunpma.com/Windows/Whole/cn_windows2019_administrator_Password147.gz' # DD Windows7 sp1 64位 [账户Administrator密码nat.ee] wget --no-check-certificate -qO InstallNET.sh 'https://moeclub.org/attachment/LinuxShell/InstallNET.sh' && bash InstallNET.sh -dd 'https://oss.sunpma.com/Windows/Whole/Win7_sp1_64_Administrator_nat.ee.gz' # DD Windows8.1 64位 [账户Administrator密码nat.ee] wget --no-check-certificate -qO InstallNET.sh 'https://moeclub.org/attachment/LinuxShell/InstallNET.sh' && bash InstallNET.sh -dd 'https://oss.sunpma.com/Windows/Whole/Win8.1_64_Administrator_nat.ee.gz' # DD Windows10 LTSC 64位 [账户Administrator密码nat.ee] wget --no-check-certificate -qO InstallNET.sh 'https://moeclub.org/attachment/LinuxShell/InstallNET.sh' && bash InstallNET.sh -dd 'https://oss.sunpma.com/Windows/Whole/Win10_LTSC_64_Administrator_nat.ee.gz'
为了避免DD包地址失效大家最好还是把DD包转存到自己的空间,下次安装的时候代码改成自己的地址进行安装
8.8.8.8
8.8.4.4
写在最后,最重要一点就是耐心,DD安装的时候没有VNC看不到安装的进度,谷歌云DD安装Windows时候比较慢一般要几个小时,所以最好安装完成后干点别的事情,睡一觉起来再实验一下是否能链接成功!

![图片[1]-2021年谷歌云DD安装Windows–安装不成功的看过来-天时网](https://1.bp.blogspot.com/-yk7DCtoQph4/YQosP9fSMtI/AAAAAAAAAVc/KkeWEQMNsKYSdfJ99qTFKzBFwM1vJPllwCLcBGAsYHQ/s320/%2B2021%25E5%25B9%25B4%25E8%25B0%25B7%25E6%25AD%258C%25E4%25BA%2591DD%25E5%25AE%2589%25E8%25A3%2585Windows--%25E5%25AE%2589%25E8%25A3%2585%25E4%25B8%258D%25E6%2588%2590%25E5%258A%259F%25E7%259A%2584%25E7%259C%258B%25E8%25BF%2587%25E6%259D%25A5.png)





暂无评论内容